Within your team, if you are looking to build CI/CD pipelines quickly, according to the needs of each project, in order to save time? Only one piece of advice: you need to master the AWS CodeBuild tool.
CodeBuild is a fully managed CI (“Continuous Integration”, “Intégration continue” in French) tool that lets you compile your source code, run tests and produce packages ready to be deployed. Discover its strengths and our 10 best practices for optimising how you use it.
Table of contents
What is continuous integration and what are its benefits?
Continuous integration is a concept much valued in DevOps; it brings together the practices used in software engineering. Among them we find the main principles:
- Compile and integrate: generate packages for compiled languages (GO, RUST, C, C++, TypeScript, …) on a homogeneous system that does not differ from the target environments.
- Measure quality: analyse code quality against the standards and best practices put in place by the company.
- Test: automatically check that the latest updates to your application work correctly.
- Deploy: update the services of the target environment.
- Alert: send a message on one or more dedicated channels, covering both the status of the application update and the triggering of cross-cutting events such as, for example, updating a service, a network device configuration, a status in a database, a notification (SMS, Mail, IM, …), an error report, and so on. The options are almost infinite!
At each stage of an update, the continuous integration workflow will therefore let you stop it from propagating before it is even deployed. Handy! It avoids a good number of errors! Even if it is not magic and your code could still reveal a few bugs.
Continuous integration is most commonly used to test application updates. Even if, given its benefits, it allows a great deal more automation, testing your application is a prerequisite that has many advantages:
- Changes are tested immediately before deployment and can block an update if an error is detected.
- If an error comes up, the teams can be alerted quickly.
- Tests are run continuously, which avoids last-minute “bugs”.
- One or more versions of the application are always available in test.
Any drawbacks? Continuous integration should not be thought of as a drawback but as an investment! And you will find that with AWS CodeBuild, that investment is tiny!
What are the strengths of CodeBuild in terms of continuous integration?
Unlike other CI tools such as Jenkins for example, AWS CodeBuild is:
- Fully managed: CodeBuild removes the need to configure, patch, update and manage your automation servers.
- Usable on demand: CodeBuild scales on demand according to your build needs. You only pay for the number of build minutes you consume.
-
Ready to use: CodeBuild provides preconfigured build environments for the most common programming languages. You simply point to your build script to start your first build.
- Integrated: CodeBuild integrates simply with all AWS services.
How do we use CodeBuild at Tigerspike? Here are the top 10 use cases:
- Packages, ad-hoc.
- Packages, as part of CodePipeline
- Builds, docker
- Unit tests
- Automation tests
- Database migration
- Database operations
- CloudFormation
- Tagging the source code repository
- Deployment marking
1. Packages, ad-hoc
It is not for nothing that it is called CodeBuild. Its main purpose is to build. So let us assume that we want to build a .Net Core package and simply put it in S3. First of all, to configure our CodeBuild project, we have to choose one of the CodeBuild images that supports our .Net Core version. See the list here.
Next, we have to configure the source provider, CodeCommit for example. Finally, you need to add a buildspec.yml (the build script file) to your source code.
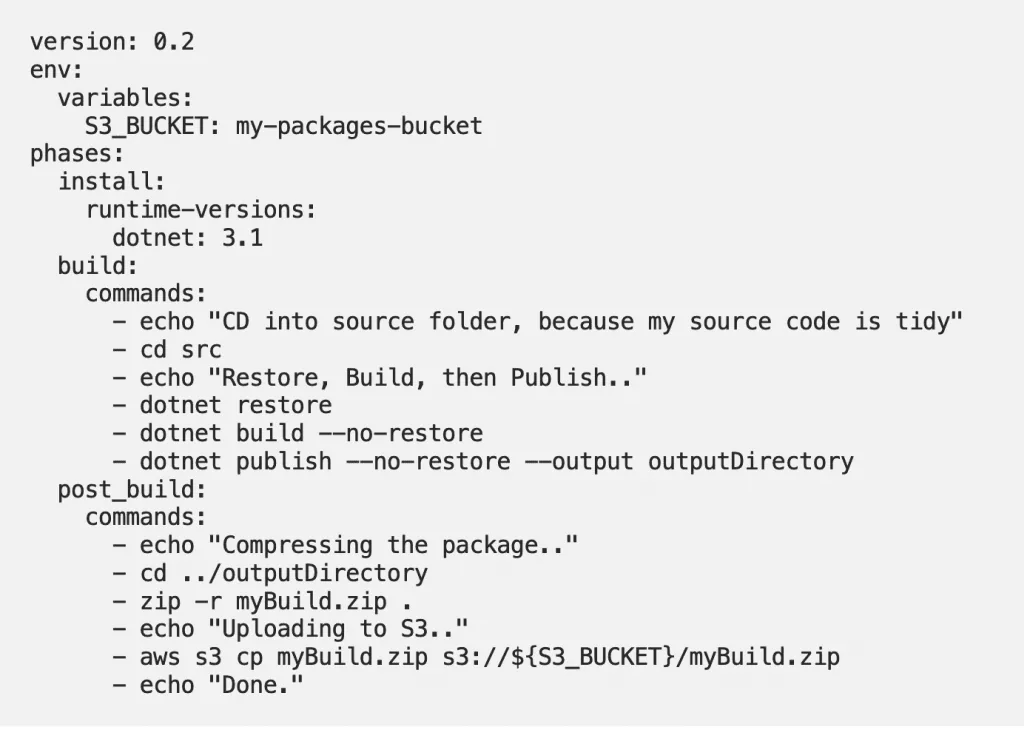
The buildspec.yml for this job should simply look something like this:
Fairly simple, isn’t it!
First, we defined the buildspec version (0.2 is recommended), then we defined the S3_BUCKET environment variable. Next, in the install phase, we specify the runtime we want CodeBuild to initialise. And fortunately, our image and our runtime ship with zip and the AWS CLI installed, so we do not need to run any other install commands.
In the build phase, we simply go into the source code folder, restore .Net, build and then publish. After the build, we go into the output folder, we compress the files (in zip format) and we upload them to S3.
As you can imagine, this CodeBuild project will need an IAM role with the right permissions to pull code from CodeCommit and put objects in S3.
2. Packages, as part of CodePipeline
Let us assume the same scenario as before. We want to build a .Net Core package but instead of uploading it to S3, we want to pass the artifacts (everything that was generated by the CodeBuild) to the next action, or Stage, in CodePipeline.
Our buildspec.yml will look like this:
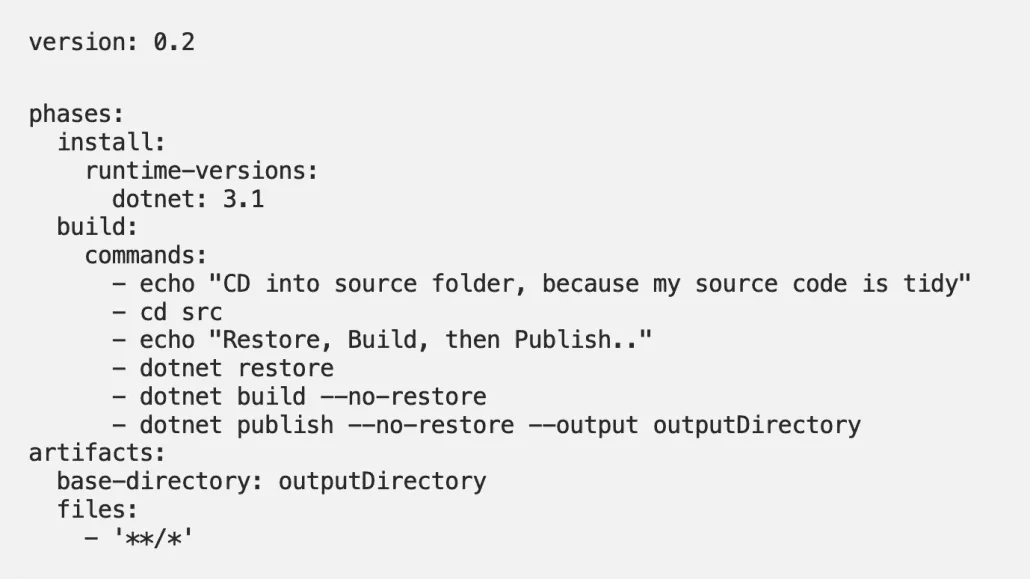
You may have noticed that the buildspec above looks a lot like the previous one, except that there is no post build phase, and no environment variables declaring the S3 bucket. Instead, CodePipeline passes the code to CodeBuild, and we declare which artifacts we want to return to CodePipeline when the job is finished.
This CodeBuild project only needs an IAM role with permissions to interact with CodePipeline.
3. Builds, docker
For this example, we are going to assume a different scenario: we want to build a Docker image and register it in Amazon Elastic Container Registry “ECR”. You can then use these images to deploy containers on AWS Elastic Container Service manually or through CodePipeline.
Assuming that we already have a Dockerfile in our repository, our buildspec.yml should look like this:
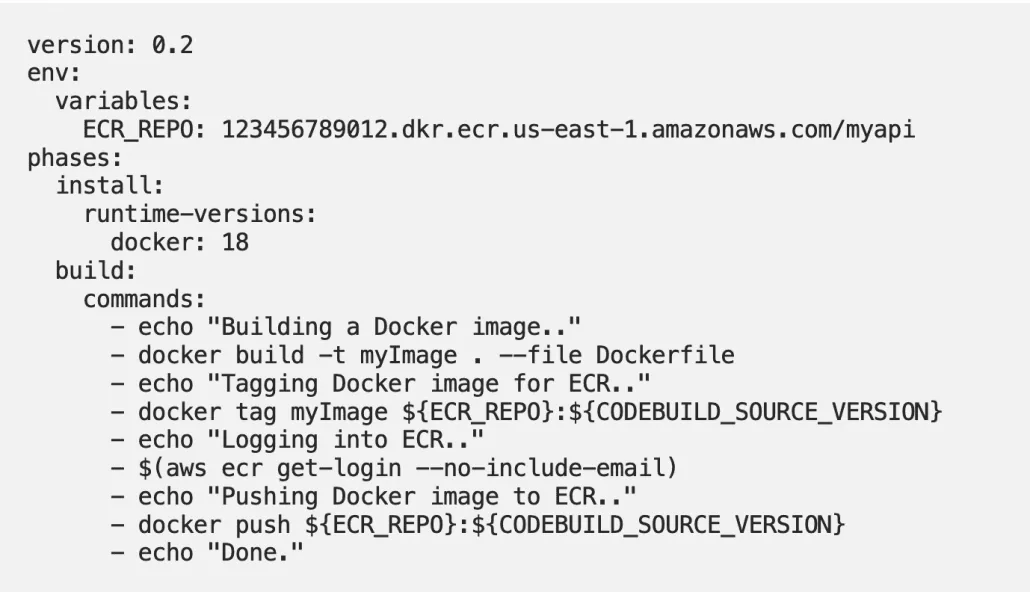
Note that you have to enable Privileged Mode in your CodeBuild configuration to be able to use it to build Docker images.
In this scenario, we defined our ECR_REPO environment variable, which is the ECR repository we want to register our images with. After that, we specify the docker 18 runtime in the install phase and then we move into the build steps.
Did you notice that we tagged our image with the CODEBUILD_SOURCE_VERSION variable? It is one of the many variables available by default in your build environment (https://docs.aws.amazon.com/fr_fr/codebuild/latest/userguide/build-env-ref-env-vars.html).
For this CodeBuild project, make sure it has an IAM role with permissions to authenticate and upload images to ECR, and to interact with your source provider.
4. Unit tests
Let us assume that we are building a Node.js package using npm, but before building and publishing the artifacts, we want to run unit tests.
Here is what our buildspec.yml should look like:
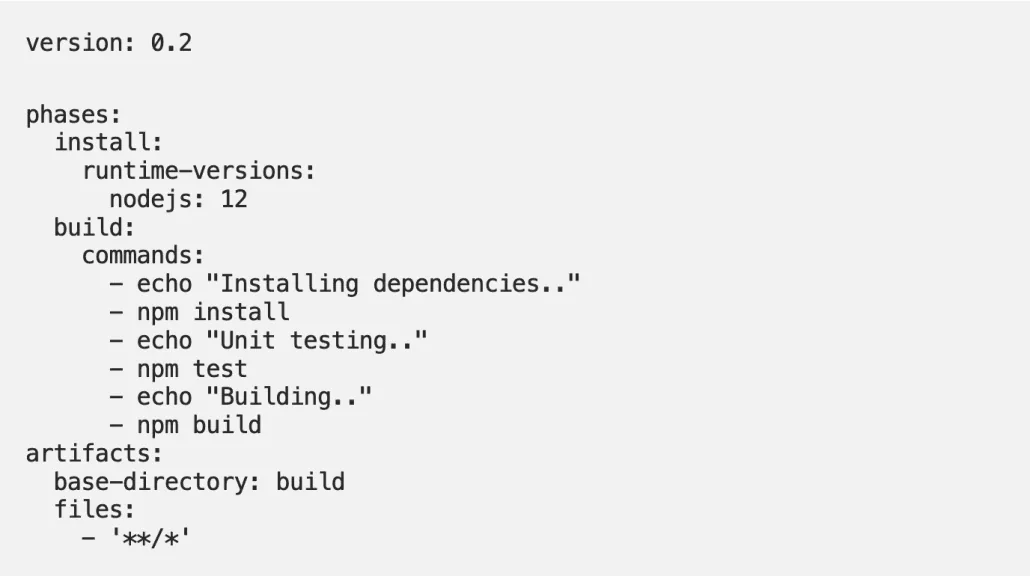
CodeBuild will run the tests in your code and if the tests fail, CodeBuild will stop at that step. It will not continue. But if it succeeded, it will pass the build artifacts to the next action or stage in CodePipeline, as in example 2 above.
This CodeBuild project only needs permissions to interact with CodePipeline. Tip: consider configuring build notifications using CloudWatch and SNS with this job if you want to be notified of success or failure.
5. Automation tests
For automation tests, our teams prefer to keep the automation test scripts in repositories separate from those of their applications. Our test scripts are written in Node.js, they run automation tests and write reports into a local reports folder. We then want to upload those reports to S3 and notify the team through SNS.
Of course, we do not want to hard-code secret data or any other sensitive information in our scripts. We are going to store them in json format in AWS Secrets Manager and retrieve them, before running the tests, into environment variables that our scripts can find.
This automated job saves a considerable amount of time. Here is a simplified example of a buildspec.yml for this job:
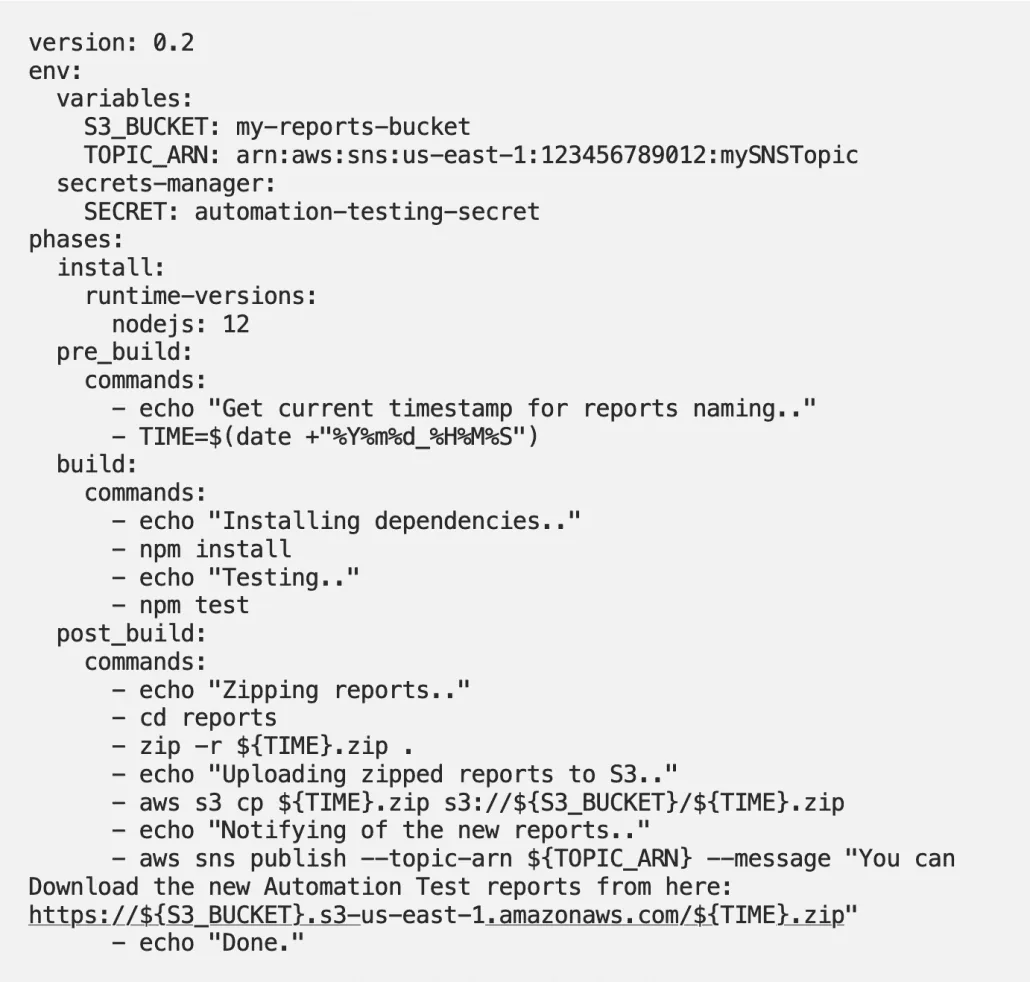
In this buildspec, our environment variables contain both plain-text variables and a reference to a secret value stored in AWS Secrets Manager. For more information on how to reference variables in a buildspec file.
In the install phase, we specify the version of Node.js we want CodeBuild to run. In the pre build phase, we get the timestamp so that we can use it to name our compressed reports folder. In the build phase, we install the dependencies and then run the tests. After the build, we compress the reports, upload them to S3 and inform the team with an SNS message. It is a very simple process, in fact.
For this CodeBuild project, you will need an IAM role that has permissions to retrieve secrets from Secrets Manager, to put objects in S3 and to publish to SNS.
6. Database migrations
During the development of new applications, software engineers often need to migrate or update database schemas and tables. It is a task that is often forgotten in CI/CD pipelines, but DevOps principles and best practices have to be applied to every piece of the puzzle. It is one of the critical tasks!
So let us assume that we have a .Net Core build running as part of a CodePipeline, as in example 2 above. However, after the build, we also want CodeBuild to generate the SQL migration script, connect to the database and run the script. And to do that, we will need 2 useful tools:– Jq: a json parser (to parse the database connection details from json) (https://stedolan.github.io/jq/)– MySQL client (to connect to our MySQL database, Aurora for example) (https://dev.mysql.com/doc/refman/8.0/en/mysql.html).
Here is what the buildspec.yml file should look like:
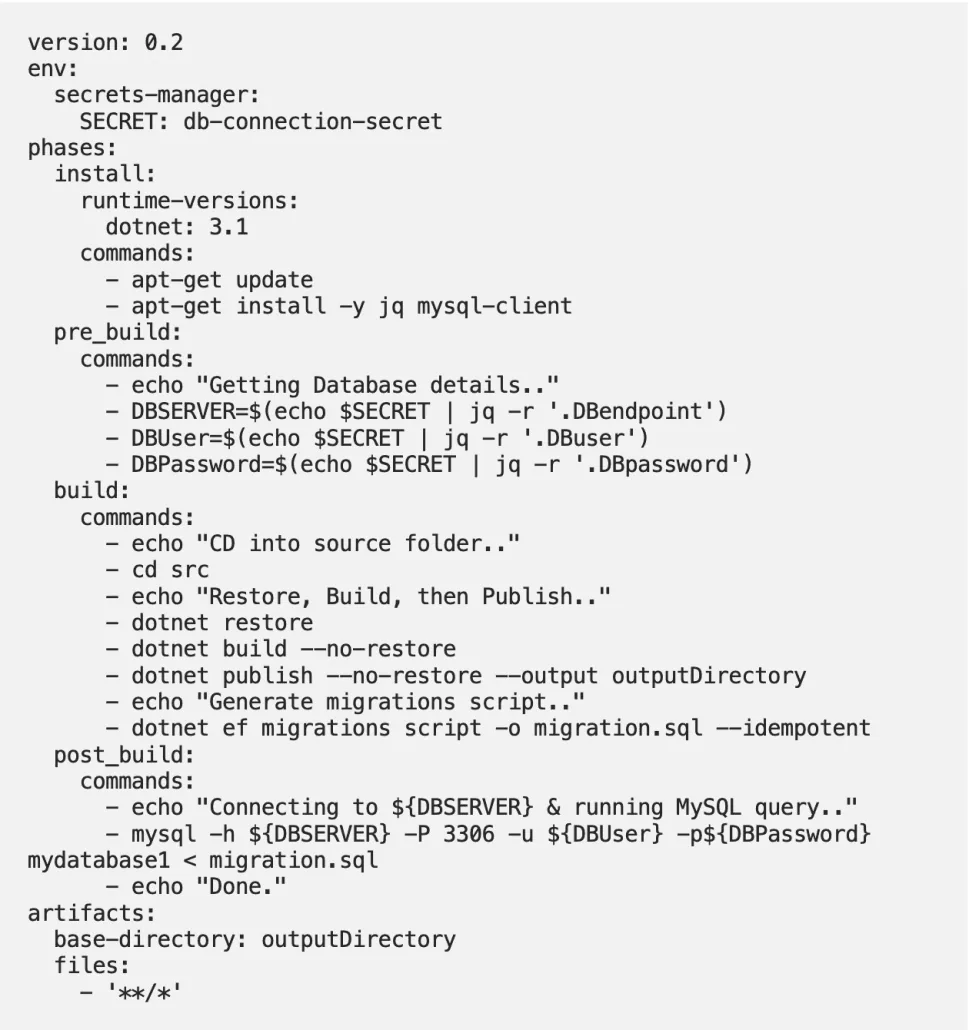
In the buildspec above, we asked CodeBuild to run .Net Core 3.1 and to install jq and the MySQL client.
Once installed, we retrieve our secret values for the database connection from AWS Secrets Manager into our environment variables. These values are contained in the details of the json object retrieved from AWS Secret and must match the connection required. After that, we are going to restore, build and publish .Net and then generate the SQL migration script.
After the build, we will connect to the database using the generated environment variables and we will pass the migration script to the database so that it is run. Once finished, as before, we will pass the build artifacts to CodePipeline.
This CodeBuild project will need an IAM role that has permissions to interact with Secrets Manager and CodePipeline. In addition, this CodeBuild project will have to be able to connect to the database instance, for example, to connect inside the VPC.
7. Database operations
As in the previous example, we want to carry out database operations somewhere in our CI/CD pipeline. Let us say for example that we have a development database instance, but that we want our large engineering team to share it. We do not want everyone connecting to the database to create new schemas (databases) and forgetting to drop them when their work is done. We want to automate this process.
We want a new schema to be created for each feature branch and to be dropped when the branch is merged.
It is not complicated, it saves time and it guarantees proper clean-ups. We did this for one of our large projects whose team was spread across several offices and it was excellent. All we had to do was configure our version control to trigger a job when a new branch is created or when a branch is merged. And on triggering, we pass the branch name and “create” or “drop” as environment variables. Any modern version control with pipeline capabilities can trigger CodeBuild through the AWS CLI.
For reference, here is what the trigger CLI command looks like, including the branch name and the action required, if we trigger from Bitbucket

And here is what the buildspec.yml file should look like:
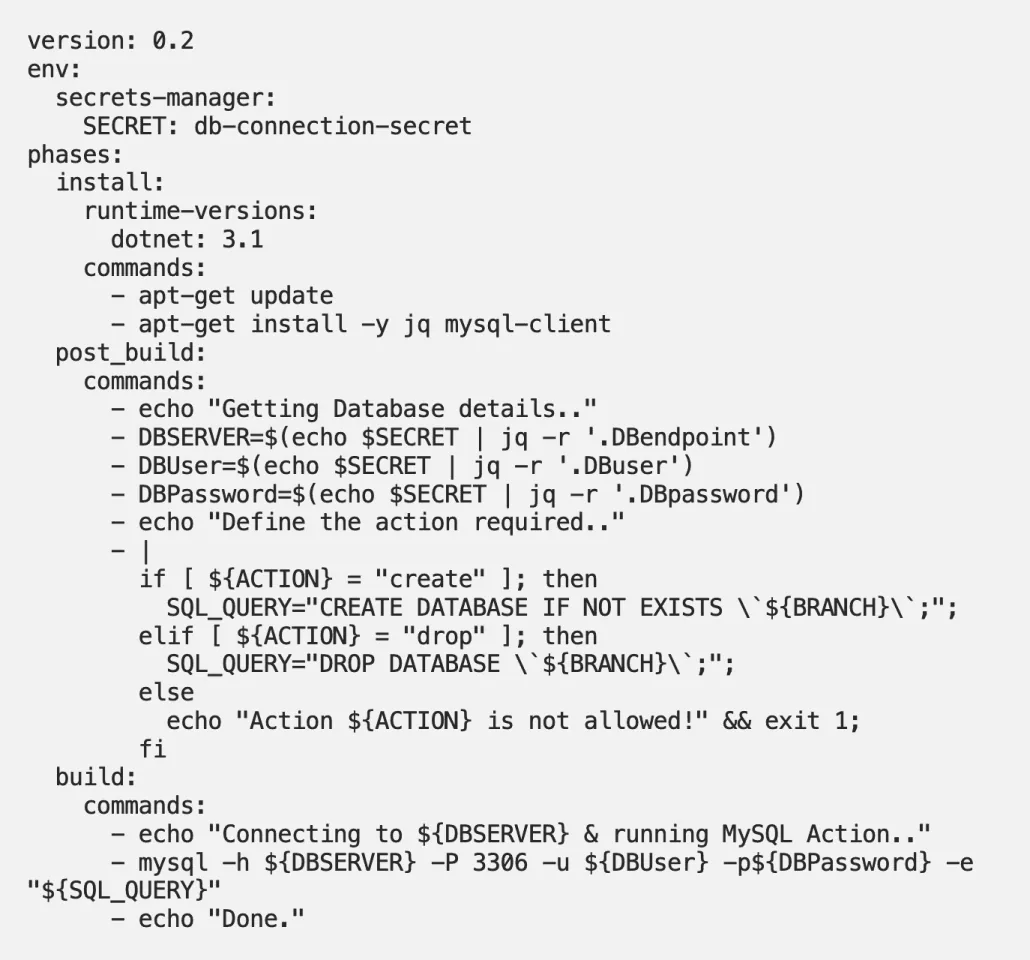
As in the previous example, we retrieve the secret values of our database connection from Secrets Manager through the environment variables. We set the SQL command we want to run according to the incoming $ACTION environment variable, namely create or drop. We also include the $BRANCH name in the command to match the schema name. Once the SQL command is set, we connect to the database and run the command.
As we mentioned, this job can be run to create or drop schemas. The schema name will match the name of the feature branch. So make sure that the branch name is limited to the characters supported by your database engine. Otherwise, you can add logic in your script to check the branch name and convert unsupported characters.
This CodeBuild project only needs permissions to retrieve secrets from Secrets Manager, and network access to the database, for example through the VPC.
8. CloudFormation
We often use the CodePipeline integration with CloudFormation to deploy or update our stacks. This can prove tricky if your CloudFormation stacks are organised as nested stacks. What you would usually do to deploy manually is use the AWS CLI to package the templates into a single one that you can deploy. Do not worry, it is easy to reproduce this operation in a CI/CD pipeline.
Here is an example buildspec.yml:
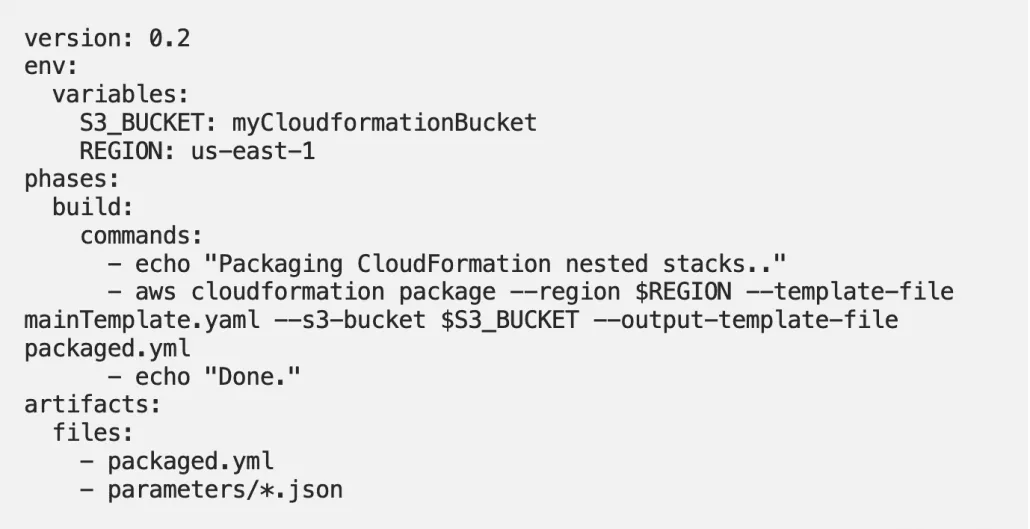
Very simple: in the buildspec above, we defined the bucket and the region where we want to upload the nested templates so that we can package CloudFormation.
Then we ran the package command. As you can see, this CodeBuild job passes the packaged.yml template along with the json parameter files as artifacts to the next deploy action in CodePipeline. You are not obliged to use parameters or parameter files with CloudFormation, but it is good practice, so do it when it makes sense.
This CodeBuild project will need permissions to write to the specified S3 bucket (for CloudFormation) as well as permissions to interact with CodePipeline.
9. Tagging the source code repository
In some workflows, we are required to mark the commit, in source control, that we have just deployed successfully to an environment. For example, after a successful production deployment, we want to label the deployed commit in source control with a prod tag.
To do this, CodeBuild will need a Git SSH key, which we will store in AWS Secrets Manager, and which we will pass in the environment variables.
Here is what our buildspec.yml should look like:
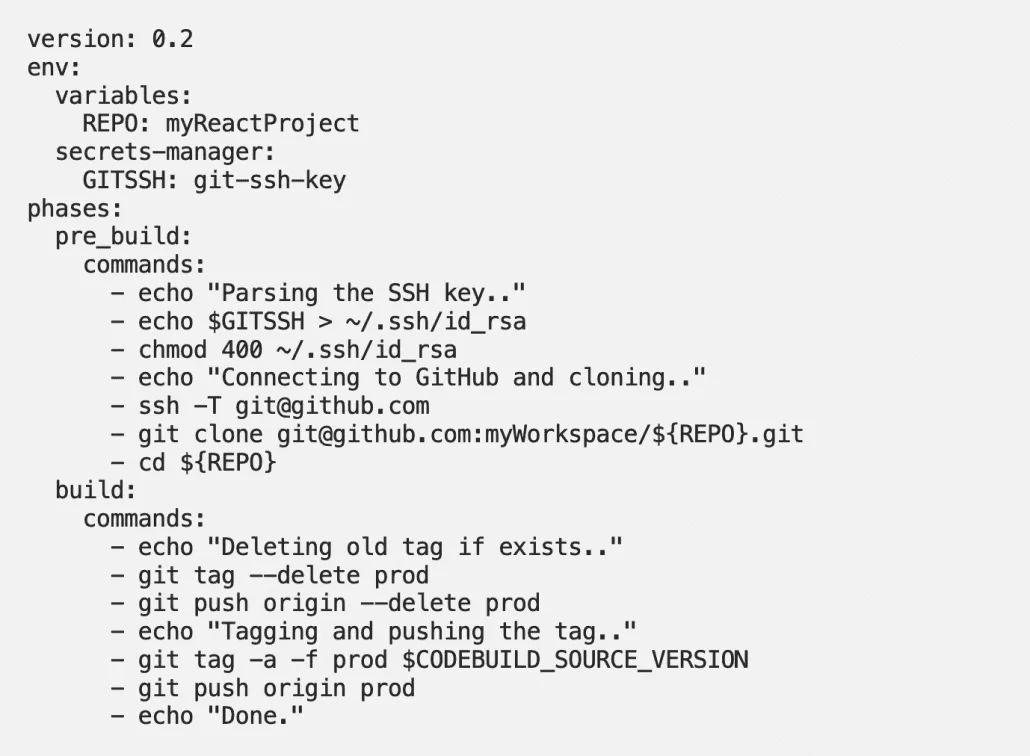
Above, we defined our environment variables, namely the name of the GitHub repository and a reference to the Git SSH key stored in AWS Secrets Manager. CodeBuild will then write the SSH key into the SSH folder, connect to GitHub, and then clone the repository. Once cloned, we will delete the tag if it already exists, we will tag the commit we deployed and then push it to GitHub. In this scenario, we used the available environment variable CODEBUILD_SOURCE_VERSION, which is the ID of the commit passed by CodePipeline as explained here. If you do not have the commit ID in the available variables, you can pass it with your build in a file.
This CodeBuild project needs permissions to retrieve secrets from Secrets Manager and to interact with CodePipeline.
10. Deployment marking
One of the good practices to follow after deployments is to mark the timeline of your monitoring system with the time and the version of the deployment. This is a record that will help you see the changes in the performance and the usage of your application and correlate them with the deployments. NewRelic, for example, lets you record deployments through the REST API.
Below you will find an example buildspec.yml for this job:
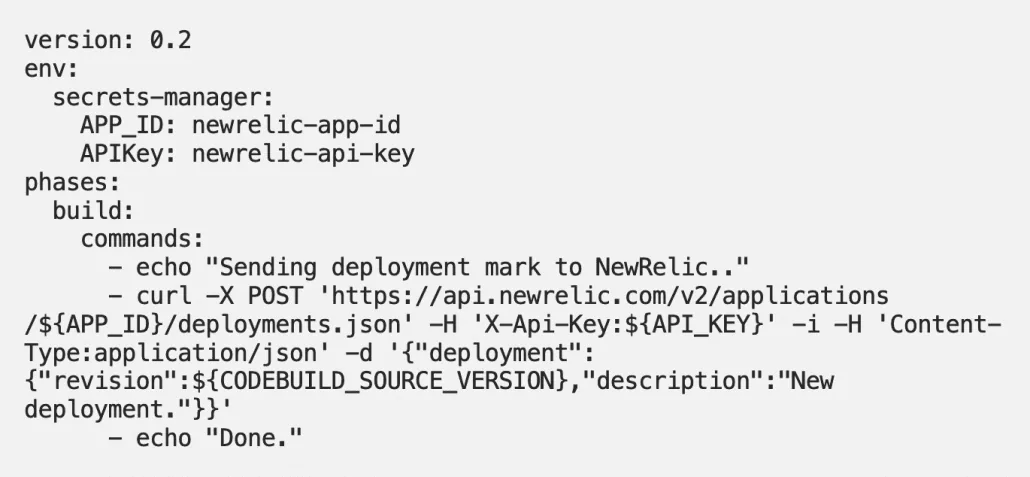
This job simply sends a POST request to NewRelic using the APP ID and the API key retrieved from Secrets Manager. The POST request includes the required parameters, including a revision and a description.
We used CODEBUILD_SOURCE_VERSION, or the commit ID, as the revision in this example.
Once again, this CodeBuild project needs permissions to retrieve secrets from Secrets Manager and to interact with CodePipeline.
Conclusion
We all agree that every project has its own requirements and that every CI/CD is unique. But when you have a tool that is this capable and this easy to use, you may as well use it intelligently. Protect your secrets, automate tasks, reduce the risk of error and save time and effort.
Source: https://malsouli.medium.com/10-smart-ways-to-use-aws-codebuild-22a8ee0d9302
If you would like advice on the AWS Cloud, do not hesitate to contact us.